Juicy, melt-in-your-mouth brisket is the holy grail of BBQ. Achieving perfectly rendered, savory slices of slow-smoked beef at home might seem daunting, but it’s absolutely achievable. This guide provides the flexibility and knowledge you need to consistently create exceptional brisket. Forget rigid rules; let’s dive into the details!
All the Smoked Brisket Info You’ve Been Looking For
This isn’t a mythical quest reserved for BBQ legends. Recreating restaurant-quality brisket in your backyard is within reach. Whether you’re a seasoned smoker or a brisket beginner, there’s always room to improve.
We’ll cover everything: selecting the perfect brisket, trimming techniques, fat cap up vs. fat cap down, smoker temperatures, the resting process, and everything in between. The goal is to equip you with the knowledge to confidently create your own “black gold.”
Let’s Find the Perfect Brisket
Start by selecting the best brisket you can afford. While choice, prime, and wagyu cuts differ, excellent results are possible even with choice, provided you know what to look for. Prime grade offers a more forgiving cook. Wagyu can be excessively rich and often overpriced.
Look for a Full Packer Brisket
Always opt for a full packer brisket, encompassing both the point and the flat.
Whole packer briskets are often cheaper per pound than buying the point or flat separately. Pre-trimmed flats and points are common, but trimming at home is preferable.
Smoking the whole brisket yields a superior finished product. If you can’t consume the entire brisket at once, separate the point and flat, freezing one for later.
Consider transforming leftovers into mouthwatering Chopped Brisket Sandwiches, Smoked Brisket Queso, BBQ Brisket Nachos, Smoked Texas Twinkies, or a Leftover Brisket Breakfast Skillet!
Selecting Your Brisket: Key Factors
Don’t be overwhelmed by the selection process. Taking a few extra minutes to choose the best brisket is worth it. Remember, these tips aren’t necessarily deal-breakers individually, but a combination of issues warrants further searching. Ask the meat department if they have additional briskets on hand.
#1. Examine the Fat Cap and Grain
Assess the fat cap for even trimming. Avoid briskets where the packer has cut too deeply, exposing the meat. Check the underside for intramuscular fat (“marbling”) in the flat. Look for white flecks of fat running parallel to the muscle fibers. The more marbling, the better, especially with Prime grade.
#2. Evaluate the Thickness
Prioritize a thick flat. A thin flat risks drying out during smoking, requiring extensive trimming. Anything less than an inch thick will likely need trimming. Consider the fat cap thickness, as it will be trimmed to ¼ inch.
#3. Assess Pliability
Feel the brisket’s pliability by gently bending it back and forth. While some believe that easier bending indicates tenderness, this isn’t always the case. A more flexible brisket might have a thinner fat cap or minimal deckle (the internal fat band separating the point and flat). If it’s rigid, expect significant trimming and a potentially thick deckle that won’t render.
#4. Choose the Right Size
Bigger isn’t always better. Smaller briskets often yield better results with less waste. It’s preferable to buy two 12-14 lb briskets than one 18-20 lb one.
How to Trim Your Brisket
Gather Your Supplies
You’ll need a large cutting surface, a very sharp knife (a 6” flexible boning knife is ideal), and a bowl for scraps. Work with cold meat, removing it from the fridge only when ready to trim.
Trimming Overview
Trimming involves removing excess fat without digging into the meat. Avoid removing too much deckle fat, which can create irregular shapes that cook unevenly. Thin sinew on the exposed meat is fine, as it will render during cooking. Round off the thinnest part of the flat to about 1” thick (minus the fat) to prevent drying. The goal is an “aerodynamic” shape for even airflow in the smoker. Aim for a ¼” fat cap.
For the point, trimming is more challenging due to the deckle’s odd shape and a thicker fat cap. Remove as much deckle as possible without creating indentations. Gauge fat cap thickness by pressing with your finger; it should feel similar to the muscle between your thumb and forefinger when making a light fist. Avoid removing all the fat from the point, as it protects the meat.
Confidence is Key
Go slowly and confidently. If unsure about removing enough fat, err on the side of caution. Every brisket is unique, and practice makes perfect.
Season the Whole Brisket
Seasoning can be done the night before or immediately before smoking.
Binder Choice
Start with the fat cap facing down and use yellow mustard as a binder. Mustard helps the seasonings adhere and enhances bark color without affecting the final flavor. Alternatives include Worcestershire, hot sauce, or mayonnaise. Avoid straight oil, as seasonings may not adhere well.
Seasoning Choice
A classic brisket rub consists of:
- 1/4 part granulated garlic
- 1 part kosher salt
- 4 parts very coarse black pepper (16 mesh is ideal)
For a smaller batch:
- 1 cup black pepper
- ¼ cup kosher salt
- 4 tsp granulated garlic
Avoid sugar in beef rubs to prevent burning and bitter flavors.
Cover the Brisket
Apply a thin layer of mustard over the entire surface. Heavily apply the seasoning, starting with the perimeter. The bottom doesn’t need to be visually perfect, but ensure even coating. Flip the brisket and repeat the process, aiming for an even, heavy coating that appears to be made of black pepper.
Smoke the Brisket
Preheat your smoker to 250-275°F (121-135°C). This is low and slow, not hot and fast. These temperatures promote thorough fat rendering and prevent excessively long cook times. Place the brisket fat cap up, with the point end facing the heat source. The point is more resilient, while the flat requires a gentler approach.
Close the lid and maintain the temperature for approximately 4 hours, undisturbed.
For a hot and fast approach, explore these recipes: Hot and Fast Smoked Brisket Recipe or Easy Smoked Brisket.
Spritzing the Smoked Brisket
After 4 hours, begin spritzing the exposed meat only. Spritzing the fat cap is counterproductive, creating evaporative cooling that prolongs cooking. Use a 50/50 mix of water and apple cider vinegar, pickle juice, or diluted Worcestershire sauce. Spritz every 45 minutes to an hour until wrapping. If edges are cooking too quickly, shield them with a double layer of heavy-duty aluminum foil.
Wrapping and Smoking Your Brisket
Forget wrapping at a specific internal temperature like 165°F (74°C). The brisket’s appearance and feel are paramount. Wrapping at 165°F is often recommended to push through “the stall,” but patience is key.
The Stall on Smoked Brisket
The stall is a period where the meat temperature plateaus, often between 150-165°F (66-74°C), lasting for hours. This is due to evaporative cooling as moisture sweats out of the meat. Higher smoking temps like 250-275°F help push through the stall.
The Bark
Wrap the brisket when the exterior looks the way you want it to. Aim for a dark, but not black, bark that is well-set on the meat. The fat should be rendering nicely, feeling spongey, not firm, when pressed. This usually occurs around 170-180°F (77-82°C), roughly 8 hours into the cook.
Butcher Paper vs Foil
Use pink butcher paper for wrapping. It allows the brisket to breathe, preserving the bark. Foil braises the meat, steaming it and turning the bark to mush.
Prep the Paper
Spritz the paper and brisket with apple cider vinegar or, even better, beef tallow. Tallow creates a brisket confit, protecting the meat from drying out and preserving the bark.
Wrapped and Back on the Smoker
Wrap the brisket as tightly as possible, tucking in corners and pulling the paper taut. Rotate the brisket two full rotations, creating multiple layers of paper. Place it back in the smoker with the flat facing the heat source for more even cooking.
How to Know When Your Smoked Brisket is Cooked
You and Your Smoker
Cooking time depends on the smoker, the brisket, heat maintenance, and lid opening frequency. Briskets can take anywhere from 6-20 hours. Trial and error are essential for understanding your smoker.
ThermaPens
While appearance and feel are crucial, a good quality thermometer pen is essential. It provides a general temperature range, indicating proximity to doneness.
However, it’s also a probe for assessing tenderness. There’s no magical “done” temperature; briskets can be ready anywhere from 200-208°F (93-98°C). You’re looking for the feel of doneness.
Where to Probe
Insert the thermometer pen into the flat end, pointing towards the point, in the thickest part of the flat. Avoid probing the deckle fat, which will give a false reading. The probe should slide into the meat with minimal resistance, usually between 200-208°F. Check regularly within this range.
A Few More Prob Tips
Focus on probing the flat. The point will likely be done when the flat is. If not, make burnt ends. If the flat is overcooked, there’s no saving it. Probe in 2-3 spots on the flat from the front.
Sometimes, a stubborn brisket will feel firm even at 208°F (98°C)+. Remove it to prevent overcooking.
Rest the Brisket
Resting is the most critical step. Skipping or rushing it will ruin the brisket.
Avoid wrapping the brisket in towels and placing it in a cooler immediately after smoking. This leads to overcooking and drying.
At high temperatures, muscle fibers remain tense and expel internal fat and liquid when sliced. Resting allows fibers to relax and reabsorb moisture.
Recommended Rest Technique
- Stop the Cooking Process: Remove the brisket from the smoker and place it on a cookie sheet. Let it cool on the counter for 30-40 minutes, until the internal temperature in the flat reaches around 180°F (82°C).
- Cooler Time: Place the brisket in a cooler. Towels aren’t necessary unless you need to extend serving time. It can take several hours for the brisket to cool enough to serve, so plan accordingly.
- The Sweet Spot: The brisket is ready to eat when the internal temperature in the thickest part reaches 140°F (60°C).
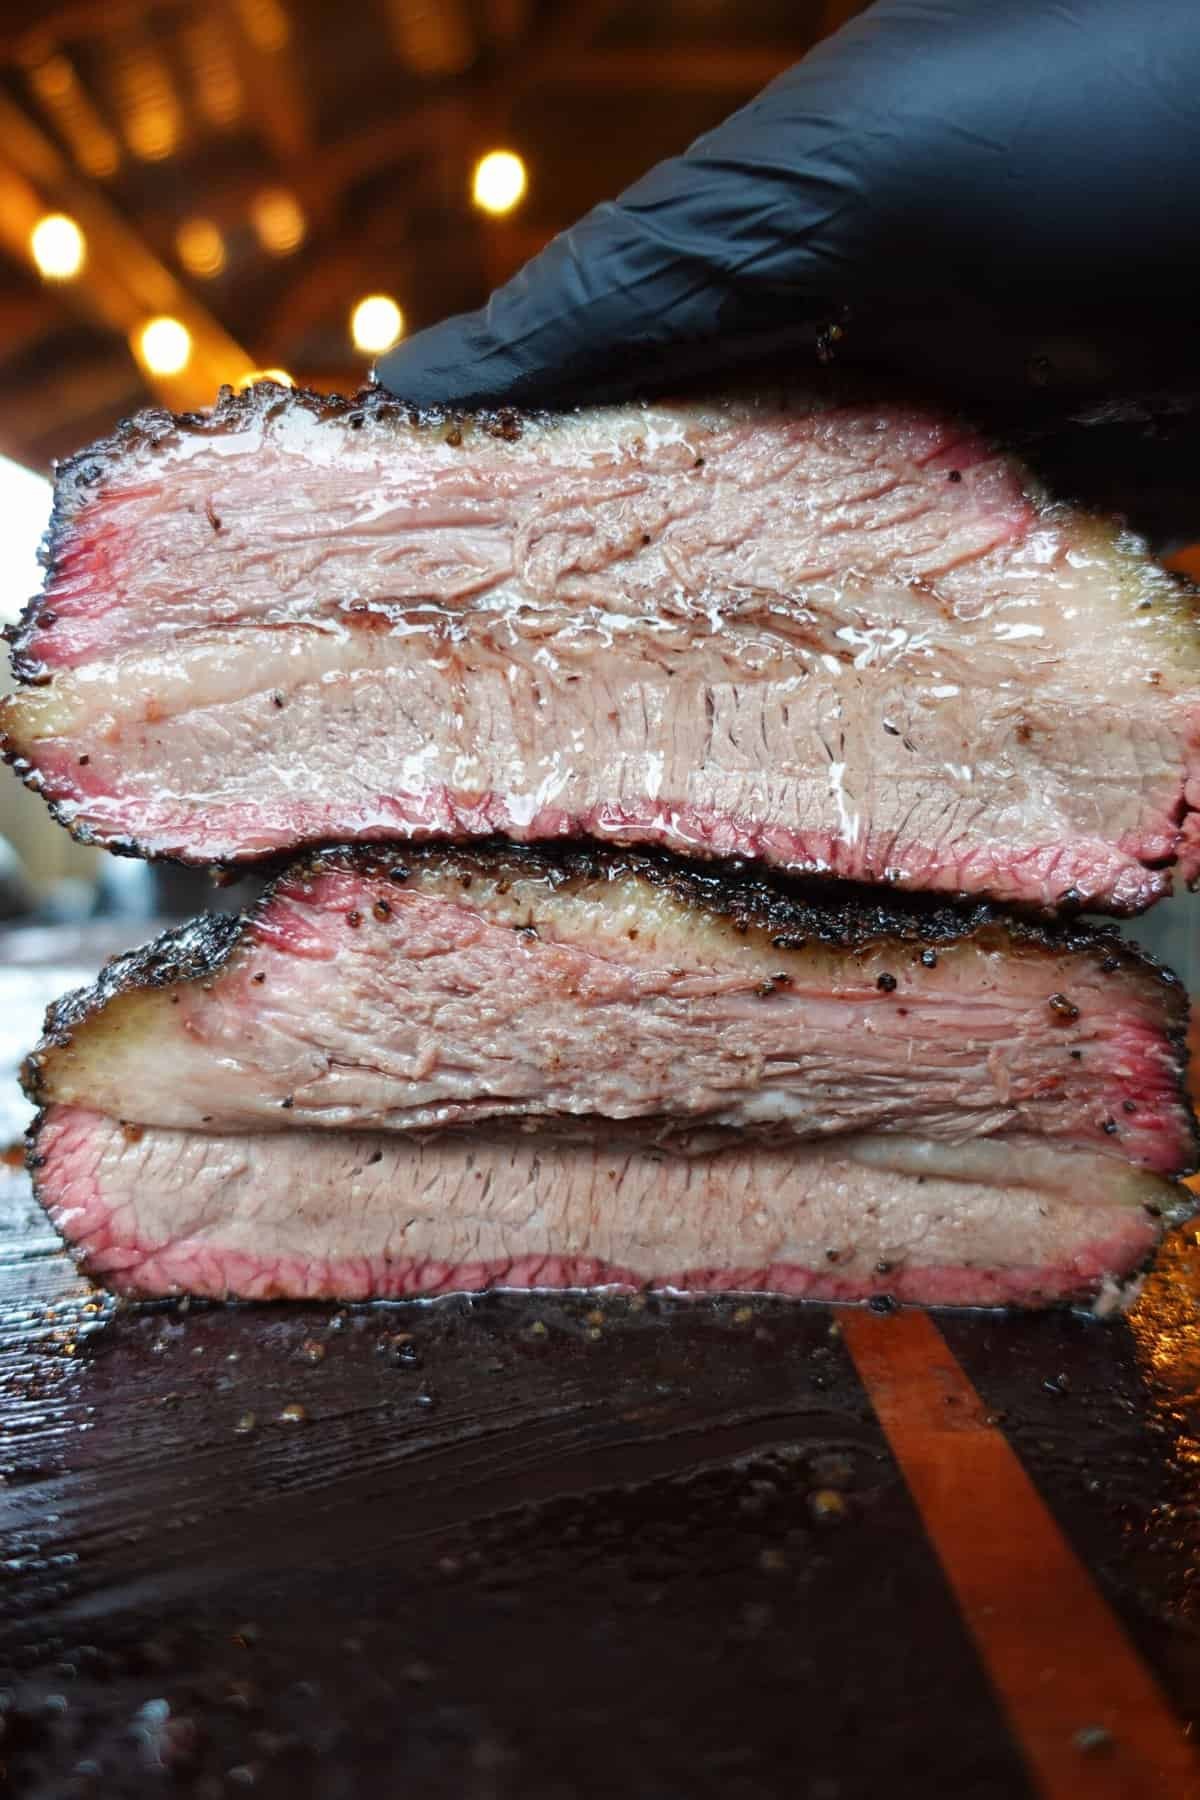
How to Slice Smoked Brisket
Orient the brisket on a large cutting board with the flat pointing towards your dominant hand.
Slice ¼ inch slices from the flat, moving towards the point. Once the flat meets the point, and you see muscle fibers running in the opposite direction, rotate the remaining point 90 degrees and slice again, slightly thicker.
If cooked properly, a slice of the flat will hold its shape without crumbling. Overcooked brisket crumbles or doesn’t hold its weight. Undercooked brisket is tough and doesn’t pull apart easily.
Evaluate the fat cap thickness to inform future trimming adjustments.
Smoke Ring on a Smoked Brisket
The smoke ring’s presence doesn’t indicate flavor. It’s a reaction between meat temperature, nitric oxide from smoke, and myoglobin (the protein that makes raw meat red). Nitric oxide reacts with myoglobin when the meat surface is below 140°F (60°C). Colder briskets yield more pronounced smoke rings.
A Final Word on Smoked Brisket
These guidelines provide a foundation for understanding the process. Practice is essential. Don’t be afraid to experiment and learn from mistakes. Good luck and happy smoking!
Try these variations: Derek’s Mesquite Peppercorn Lager Smoked Brisket or Texas Smoked Brisket Recipe!
Smoked Brisket Recipe
**Smoked Brisket**
The king of BBQ. Let us help you master it!

Author:Nick Hill

Prep Time: 30 minutes
Cook Time: 15 hours
Resting Time: 3 hours
Total Time: 18 hours 30 minutes

Course: Main Course
Cuisine: American
Servings: 10 People

**Ingredients**

* 1 whole packer brisket 12-14lb
* Yellow mustard for the binder
* 1 cup 16 mesh black pepper
* ¼ cup kosher salt
* 4 tsp granulated garlic
* Pink butcher paper
* 1 1/2 cups beef tallow warmed up to liquify

**Spritz**

* 1 cup apple cider vinegar
* 1 cup water

**Instructions**

1.  **Prep the Smoker:** Preheat your smoker to 250° – 275° degrees. Start with smaller pieces of dry wood when first and a couple handfuls of lump charcoal. Be sure to stack each layer perpendicular to each other to allow for proper airflow. If you start with two logs running the length of the fire box in the direction in which the air flows through the smoker, and put the lump charcoal in between these two logs, you will encourage a great bed of coals and no restricted airflow. You can use a fire starter or torch to help get your fire going. Whatever you do, don’t use lighter fluid. Maintain these temps through the entire cook.
2.  **Prep the Brisket:** Trim the excess fat from the bottom (flat) and top (fat cap) of the brisket. Being careful not to gouge the meat or fat while leaving ¼ inch of fat evenly across the entire fat cap. Starting with the fat cap down, apply a thin layer of yellow mustard to help the seasonings adhere to the surface. Thoroughly mix together the salt, pepper and granulated garlic and apply a very heavy and even layer including all 4 sides of the brisket. Flip the brisket over so that the fat cap is facing up and repeat the process of mustard then seasoning. (You can do this step the night before. Just cover the brisket in an airtight container or wrap in plastic wrap).
3.  **Smoke the Brisket:** Place the brisket fat cap up inside your smoker with the point end facing the heat source. Close the lid and do not open it for the first 4 hours. After the first 4 hours, mix the apple cider vinegar and water in a spray bottle, and spray the edges of the brisket but avoid excess spray on the fat. Do this once every hour or so until you have developed a level of bark that you are happy with. Generally, around 170-180 degrees F internal temp. Once you are happy with the color and consistency of the bark, roll out enough butcher paper to wrap the brisket up two full rotations and lay it flat on a prepared cooking surface.
4.  **Wrap the Brisket:** Remove the brisket from the smoker and place on your butcher paper roughly 16” from one end. Pour the liquified beef tallow all over the brisket completely covering all surfaces. Wrap the brisket tightly in the paper being sure to pull the brisket in tight and tuck in the corners after each flip. Wrap the brisket in two full rotations of paper being sure that the fat side is still up before placing it back in the smoker.
5.  **Continue to Smoke:** Put the brisket back in the smoker with the flat side pointing towards the heat source. Continue to cook until you can insert a thermometer pen probe with very little resistance. Be sure to check the thickest part of the flat from the front, not the side or the top. The temp will range from 200°-208° so be sure to probe for tenderness regularly during these temp ranges.
6.  **Remove and Rest:** When the probe goes into the flat with little resistance after checking multiple spots, remove the brisket from the smoker, leaving it wrapped. Let it rest on the kitchen counter for 30-40 minutes, or until the internal temp hits between 180°-185° internal temp in the flat. Then place the brisket in a cooler and close the lid letting the brisket come down in temp slowly until the internal temp hits 140°. This can take several hours.
7.  **Slice and Serve:** After the brisket hits 140°, you can remove it from the cooler and place it on a larger cutting board while you remove the pink butcher paper. Starting with the flat, slice ¼” slices with your knife perpendicular to the brisket going from the flat to the point, until you have about 1/3 point and 2/3rds flat exposed. Then rotate the remaining point end 90 degrees and continue slicing making slightly thicker slices. Serve 2-3 slices per guest pairing with pickled red onions, rolls or white bread and your favorite BBQ sauce. Enjoy!