What Color Is Brake Fluid and why does it matter? Understanding the color of your brake fluid is crucial for maintaining a safe and efficient braking system. At WHAT.EDU.VN, we provide expert insights into brake fluid color, its significance, and how to identify potential issues. Explore this comprehensive guide to brake fluid and discover the easy way to get your pressing questions answered on our platform. Learn about brake fluid contamination, hydraulic fluid, and brake system maintenance.
1. Understanding Brake Fluid Color
Brake fluid is a critical component of your vehicle’s braking system, responsible for transmitting the force from your foot on the brake pedal to the brakes at the wheels. The color of brake fluid can indicate its condition and whether it needs to be replaced.
1.1. New Brake Fluid Colors
New brake fluid typically has a light color, which can vary depending on the type of fluid:
- DOT 3 and DOT 4: These are usually clear to pale amber in color.
- DOT 5: This is often purple or blue to help distinguish it from DOT 3 and DOT 4 fluids.
- DOT 5.1: This can be clear or light yellow.
1.2. Why Color Matters
The color of brake fluid is not just for aesthetics; it’s an indicator of the fluid’s condition and potential contamination. Here’s why it matters:
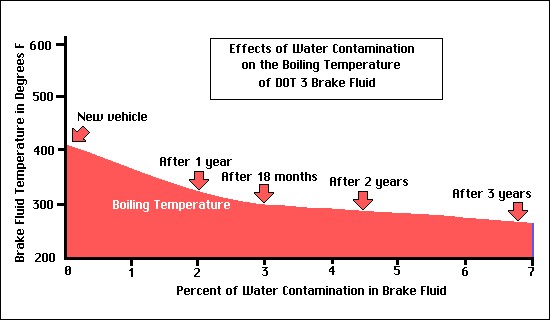
- Moisture Contamination: Brake fluid is hygroscopic, meaning it absorbs moisture from the air. As it absorbs moisture, the brake fluid’s color can change, often becoming darker. This moisture can lead to corrosion within the braking system and reduce the fluid’s boiling point, compromising brake performance.
- Metal Particles: As the braking system components wear, metal particles can accumulate in the brake fluid. These particles can cause the fluid to darken and become abrasive, leading to further wear and tear on the system.
- Fluid Degradation: Over time, brake fluid can degrade due to heat and pressure. This degradation can cause the fluid to change color and lose its effectiveness.
1.3. Factors Affecting Brake Fluid Color
Several factors can influence the color of brake fluid:
- Type of Fluid: Different types of brake fluid have different original colors.
- Age: As brake fluid ages, it naturally darkens due to contamination and degradation.
- Environmental Conditions: Exposure to moisture and extreme temperatures can accelerate the darkening process.
- Braking Habits: Frequent hard braking can cause the fluid to overheat and degrade more quickly.
2. Decoding Brake Fluid Colors: What They Indicate
Interpreting the color of your brake fluid can help you identify potential issues and take timely corrective action.
2.1. Clear or Light Amber
- Condition: New or relatively new fluid.
- Implication: Generally indicates that the fluid is in good condition and performing as expected.
- Action: Monitor the fluid regularly to ensure it remains clean and clear.
2.2. Light to Medium Brown
- Condition: Slightly aged fluid.
- Implication: Indicates some moisture absorption and minor degradation. The fluid is still likely functional, but its performance may be slightly reduced.
- Action: Consider checking the fluid’s moisture content with a brake fluid tester. If the moisture level is high, it’s time for a brake fluid flush.
2.3. Dark Brown or Black
- Condition: Significantly aged or contaminated fluid.
- Implication: High moisture content, significant degradation, and potential contamination with metal particles. The fluid’s boiling point is likely reduced, and braking performance may be severely compromised.
- Action: Immediate brake fluid flush is necessary. Inspect the braking system for signs of corrosion or damage.
2.4. Milky or Cloudy
- Condition: Significant moisture contamination.
- Implication: Water has mixed with the brake fluid, leading to a cloudy or milky appearance. This can cause corrosion and significantly reduce braking effectiveness.
- Action: Immediate brake fluid flush is essential. Inspect the entire braking system for corrosion and damage.
2.5. Unusual Colors (e.g., Green, Red)
- Condition: Potential contamination with other fluids.
- Implication: Brake fluid should not be green or red. These colors indicate contamination with other automotive fluids, which can compromise braking performance and damage the system.
- Action: Immediate brake fluid flush is necessary. Identify the source of contamination and repair any leaks or issues.
3. Types of Brake Fluid and Their Colors
Different types of brake fluid have different chemical compositions, affecting their performance and color.
3.1. DOT 3 Brake Fluid
- Composition: Glycol-based.
- Color: Clear to pale amber when new.
- Characteristics: Good all-around performance, hygroscopic (absorbs moisture).
- Usage: Common in older vehicles and some modern cars.
3.2. DOT 4 Brake Fluid
- Composition: Glycol-based with added borate esters.
- Color: Clear to light amber when new.
- Characteristics: Higher boiling point than DOT 3, better performance in high-temperature conditions, hygroscopic.
- Usage: Often used in vehicles with ABS (Anti-lock Braking System) and performance cars.
 DOT 4 brake fluid is commonly used in vehicles with ABS (Anti-lock Braking System) and performance cars due to its higher boiling point and better performance in high-temperature conditions
3.3. DOT 5 Brake Fluid
- Composition: Silicone-based.
- Color: Typically purple or blue when new.
- Characteristics: Non-hygroscopic (does not absorb moisture), higher boiling point, does not damage paint.
- Usage: Often used in classic cars and vehicles stored for long periods. Not compatible with ABS systems in some cases.
3.4. DOT 5.1 Brake Fluid
- Composition: Glycol-based with advanced additives.
- Color: Clear to light yellow when new.
- Characteristics: Very high boiling point, good performance in extreme conditions, hygroscopic.
- Usage: Used in high-performance vehicles and racing applications.
3.5. Compatibility Considerations
Mixing different types of brake fluid can lead to serious braking system problems. Always use the type of fluid recommended by your vehicle manufacturer. DOT 3 and DOT 4 fluids can usually be mixed, but DOT 5 should never be mixed with DOT 3, DOT 4, or DOT 5.1.
4. How to Check Your Brake Fluid Color
Checking your brake fluid color is a simple process that can be done regularly as part of your vehicle maintenance routine.
4.1. Safety Precautions
- Wear Gloves: Brake fluid can be harmful if it comes into contact with your skin.
- Eye Protection: Protect your eyes from splashes.
- Ventilation: Work in a well-ventilated area.
- Cleanliness: Keep brake fluid away from painted surfaces, as it can damage them.
4.2. Steps to Check Brake Fluid Color
- Locate the Brake Fluid Reservoir: This is usually a translucent plastic container located under the hood, often near the master cylinder. Consult your vehicle’s owner’s manual if you’re unsure of its location.
- Clean the Reservoir: Wipe the outside of the reservoir with a clean cloth to remove any dirt or debris.
- Inspect the Fluid: Look at the color of the brake fluid through the reservoir. If the reservoir is too dirty to see through, you may need to remove the cap (following safety precautions) and use a clean dipstick or turkey baster to extract a small amount of fluid for inspection.
- Evaluate the Color: Compare the color of the fluid to the descriptions above to determine its condition.
- Check the Fluid Level: Ensure the fluid level is between the minimum and maximum lines on the reservoir. Add fluid if necessary, using the correct type for your vehicle.
4.3. Tools You May Need
- Gloves
- Eye protection
- Clean cloth
- Dipstick or turkey baster (if needed)
- Brake fluid (correct type for your vehicle)
5. Common Brake Fluid Problems and Solutions
Identifying and addressing common brake fluid problems can prevent costly repairs and ensure your vehicle’s braking system operates safely.
5.1. Moisture Contamination
- Problem: Brake fluid absorbs moisture from the air, lowering its boiling point and causing corrosion.
- Symptoms: Dark or cloudy fluid, spongy brake pedal, reduced braking performance.
- Solution: Perform a brake fluid flush every 2-3 years or as recommended by your vehicle manufacturer.
5.2. Air in the Brake Lines
- Problem: Air can enter the brake lines during maintenance or due to leaks, causing a loss of braking pressure.
- Symptoms: Spongy brake pedal, reduced braking performance.
- Solution: Bleed the brake lines to remove air. This process involves opening the bleeder valves on each brake caliper and pumping the brake pedal to force air out of the system.
5.3. Leaks
- Problem: Leaks in the brake lines, master cylinder, or calipers can cause a loss of brake fluid and reduced braking performance.
- Symptoms: Low brake fluid level, soft brake pedal, visible fluid leaks.
- Solution: Inspect the entire braking system for leaks. Repair or replace any damaged components.
5.4. Contamination
- Problem: Brake fluid can become contaminated with dirt, debris, or other fluids, compromising its performance.
- Symptoms: Dark or discolored fluid, reduced braking performance.
- Solution: Perform a brake fluid flush. Clean or replace the brake fluid reservoir if necessary.
5.5. Choosing the Right Brake Fluid
- Problem: Using the wrong type of brake fluid can damage the braking system and reduce its effectiveness.
- Symptoms: Poor braking performance, component failure.
- Solution: Always use the type of brake fluid recommended by your vehicle manufacturer. Check your owner’s manual for specifications.
6. Step-by-Step Guide to Brake Fluid Flush
Performing a brake fluid flush is a critical maintenance task that helps ensure the longevity and reliability of your vehicle’s braking system.
6.1. Gather Necessary Tools and Materials
- New brake fluid (correct type for your vehicle)
- Brake bleeder kit or clear tubing and a container
- Wrench (for bleeder valves)
- Jack and jack stands
- Wheel chocks
- Gloves and eye protection
- Clean rags
6.2. Prepare Your Vehicle
- Park on a Level Surface: Ensure your vehicle is parked on a level surface.
- Engage the Parking Brake: Engage the parking brake to prevent the vehicle from rolling.
- Chock the Wheels: Place wheel chocks behind the rear wheels for added safety.
- Loosen the Lug Nuts: Loosen the lug nuts on all four wheels before jacking up the vehicle.
- Raise the Vehicle: Use a jack to lift the vehicle and securely place it on jack stands.
- Remove the Wheels: Remove all four wheels to access the brake calipers.
6.3. Locate the Brake Bleeder Screws
Locate the brake bleeder screws on the back of each brake caliper. Remove the rubber caps covering the bleeder screws.
6.4. Start the Flushing Process
- Attach the Bleeder Kit: Attach the brake bleeder kit or clear tubing to the bleeder screw on the caliper farthest from the master cylinder (usually the rear passenger side). Place the other end of the tubing into a container to collect the old brake fluid.
- Open the Bleeder Screw: Use a wrench to carefully open the bleeder screw.
- Pump the Brake Pedal: Have an assistant slowly pump the brake pedal several times, holding it down on the last stroke.
- Close the Bleeder Screw: While the brake pedal is held down, close the bleeder screw.
- Release the Brake Pedal: Release the brake pedal.
- Repeat the Process: Repeat steps 3-5 until the new, clean brake fluid starts to flow through the tubing.
- Monitor the Brake Fluid Reservoir: Regularly check the brake fluid reservoir and add new fluid as needed to prevent it from running dry.
6.5. Repeat for Each Caliper
Repeat the flushing process for each caliper, moving from the farthest to the nearest from the master cylinder (rear passenger, rear driver, front passenger, front driver).
6.6. Final Steps
- Tighten the Bleeder Screws: Once all calipers have been flushed, tighten the bleeder screws to the manufacturer’s specified torque.
- Replace the Rubber Caps: Replace the rubber caps on the bleeder screws.
- Reinstall the Wheels: Reinstall the wheels and tighten the lug nuts.
- Lower the Vehicle: Lower the vehicle from the jack stands.
- Torque the Lug Nuts: Torque the lug nuts to the manufacturer’s specified torque.
- Test the Brakes: Pump the brake pedal several times to ensure it feels firm. Take the vehicle for a short test drive to ensure the brakes are functioning correctly.
7. The Importance of Regular Brake Fluid Checks
Regular brake fluid checks are essential for maintaining a safe and efficient braking system.
7.1. Preventing Brake Failure
- Moisture Contamination: Regular checks help identify moisture contamination early, preventing corrosion and maintaining the fluid’s boiling point.
- Fluid Degradation: Monitoring the fluid’s color and condition helps detect degradation, ensuring the fluid remains effective.
- Leaks: Regular checks can identify leaks early, preventing loss of fluid and maintaining proper braking pressure.
7.2. Extending Component Life
- Corrosion Prevention: Clean, fresh brake fluid prevents corrosion of brake lines, calipers, and other components.
- Wear Reduction: Regular flushes remove abrasive particles from the fluid, reducing wear and tear on the braking system.
7.3. Maintaining Optimal Performance
- Consistent Braking: Fresh brake fluid ensures consistent and reliable braking performance.
- Responsive Pedal Feel: Clean fluid contributes to a firm and responsive brake pedal feel.
7.4. Recommended Intervals
- Visual Inspection: Check the brake fluid color and level monthly.
- Moisture Test: Test the brake fluid for moisture content every 6 months.
- Flush: Perform a complete brake fluid flush every 2-3 years or as recommended by your vehicle manufacturer.
8. Troubleshooting Brake Fluid Color Changes
If you notice changes in your brake fluid color, it’s important to troubleshoot the issue to prevent further problems.
8.1. Darkening Fluid
- Possible Causes: Moisture contamination, fluid degradation, metal particles.
- Troubleshooting Steps:
- Check the fluid for moisture content using a brake fluid tester.
- Inspect the braking system for leaks or damage.
- Perform a brake fluid flush.
- If the fluid darkens quickly after the flush, inspect the master cylinder and calipers for internal damage.
8.2. Cloudy or Milky Fluid
- Possible Causes: Significant moisture contamination.
- Troubleshooting Steps:
- Perform an immediate brake fluid flush.
- Inspect the entire braking system for corrosion.
- Check the brake fluid reservoir cap for a proper seal.
8.3. Unusual Colors (e.g., Green, Red)
- Possible Causes: Contamination with other fluids.
- Troubleshooting Steps:
- Identify the source of contamination.
- Perform an immediate brake fluid flush.
- Repair any leaks or issues causing the contamination.
- Inspect the brake lines and components for damage.
8.4. Low Fluid Level
- Possible Causes: Leaks in the braking system.
- Troubleshooting Steps:
- Inspect the brake lines, master cylinder, and calipers for leaks.
- Check the brake fluid reservoir for cracks or damage.
- Repair or replace any damaged components.
- Bleed the brake lines after repairing the leak.
9. Brake Fluid and ABS Systems
Anti-lock Braking Systems (ABS) require specific types of brake fluid to function correctly.
9.1. ABS Compatibility
- DOT 3 and DOT 4: Generally compatible with most ABS systems.
- DOT 5: May not be compatible with some ABS systems due to its silicone-based composition. Check your vehicle manufacturer’s recommendations.
- DOT 5.1: Designed for high-performance vehicles with ABS and offers excellent performance.
9.2. Fluid Recommendations
- Consult Your Owner’s Manual: Always check your vehicle’s owner’s manual for the recommended type of brake fluid for your ABS system.
- Avoid Mixing Fluids: Never mix DOT 5 with other types of brake fluid in an ABS system.
- Regular Maintenance: Regular brake fluid flushes are essential for maintaining the performance of your ABS system.
9.3. ABS Warning Signs
- ABS Light On: If the ABS warning light illuminates on your dashboard, it indicates a problem with the ABS system.
- Reduced Braking Performance: If you experience reduced braking performance or a spongy brake pedal, it could be related to the ABS system.
- Unusual Noises: Unusual noises during braking, such as grinding or squealing, can indicate an ABS issue.
10. Expert Tips for Maintaining Brake Fluid
Maintaining your brake fluid properly can extend the life of your braking system and ensure safe operation.
10.1. Use the Right Fluid
- Check Your Owner’s Manual: Always use the type of brake fluid recommended by your vehicle manufacturer.
- Avoid Substitutions: Do not substitute different types of brake fluid unless explicitly approved by the manufacturer.
10.2. Store Brake Fluid Properly
- Sealed Containers: Store brake fluid in sealed containers to prevent moisture absorption.
- Cool, Dry Place: Store brake fluid in a cool, dry place away from direct sunlight.
- Discard Old Fluid: Discard any brake fluid that has been opened for more than a year.
10.3. Regular Inspections
- Monthly Checks: Check the brake fluid color and level monthly.
- Professional Inspections: Have your braking system inspected by a qualified mechanic during routine maintenance.
10.4. Brake Fluid Testers
- Invest in a Tester: Purchase a brake fluid tester to check for moisture content.
- Regular Testing: Test the brake fluid regularly, especially in humid climates.
10.5. Flushing Techniques
- Complete Flush: Ensure a complete brake fluid flush to remove all old fluid from the system.
- Proper Bleeding: Properly bleed the brake lines to remove any air.
11. Addressing Common Misconceptions About Brake Fluid Color
There are several misconceptions about brake fluid color that can lead to improper maintenance.
11.1. “Clear Fluid is Always Good”
- The Truth: While clear fluid is generally a good sign, it doesn’t guarantee the fluid is in perfect condition. It’s important to check for moisture content and other signs of degradation.
11.2. “Dark Fluid Always Means Trouble”
- The Truth: Dark fluid often indicates contamination or degradation, but it’s not always a sign of immediate danger. Test the fluid and inspect the system to determine the extent of the problem.
11.3. “DOT 5 Never Needs Changing”
- The Truth: While DOT 5 is non-hygroscopic, it can still become contaminated over time. Regular checks and occasional flushes are still necessary.
11.4. “Mixing DOT 3 and DOT 4 is Fine”
- The Truth: While DOT 3 and DOT 4 are compatible, mixing them can reduce the overall boiling point of the fluid. It’s best to use the recommended fluid type and avoid mixing whenever possible.
11.5. “Brake Fluid Color Doesn’t Matter”
- The Truth: Brake fluid color is a valuable indicator of the fluid’s condition and potential problems. Ignoring color changes can lead to brake failure and costly repairs.
12. DIY vs. Professional Brake Fluid Services
Deciding whether to perform brake fluid services yourself or hire a professional depends on your mechanical skills and comfort level.
12.1. DIY Brake Fluid Services
- Pros:
- Cost savings
- Convenience
- Opportunity to learn about your vehicle
- Cons:
- Requires mechanical skills and tools
- Potential for mistakes
- Time-consuming
12.2. Professional Brake Fluid Services
- Pros:
- Expertise and experience
- Proper tools and equipment
- Warranty on services
- Cons:
- Higher cost
- Scheduling inconvenience
12.3. When to Choose DIY
- Simple Tasks: Checking fluid levels and color.
- Basic Flushes: If you have experience with brake systems and the necessary tools.
12.4. When to Choose a Professional
- Complex Issues: If you suspect major contamination, leaks, or ABS problems.
- Lack of Experience: If you are not comfortable working on brake systems.
- Warranty Concerns: If you want a warranty on the services performed.
13. Staying Safe on the Road: Brake Fluid and You
Ensuring your brake fluid is in good condition is crucial for staying safe on the road.
13.1. Regular Maintenance
- Consistent Checks: Make brake fluid checks a regular part of your vehicle maintenance routine.
- Timely Flushes: Perform brake fluid flushes as recommended by your vehicle manufacturer.
13.2. Addressing Issues Promptly
- Don’t Ignore Warning Signs: Address any changes in brake fluid color or performance immediately.
- Professional Help: Seek professional help if you are unsure about any aspect of brake fluid maintenance.
13.3. Safe Driving Habits
- Avoid Hard Braking: Minimize hard braking to reduce heat and stress on the braking system.
- Anticipate Traffic: Anticipate traffic conditions to avoid sudden stops.
- Proper Following Distance: Maintain a safe following distance to allow ample time to brake.
13.4. Emergency Preparedness
- Know Your Vehicle: Understand how your vehicle’s braking system operates.
- Emergency Procedures: Know what to do in case of brake failure.
14. Frequently Asked Questions (FAQs) About Brake Fluid Color
| Question | Answer |
|---|---|
| What is the normal color of brake fluid? | New brake fluid is typically clear to pale amber for DOT 3 and DOT 4, and purple or blue for DOT 5. |
| Why does brake fluid change color? | Brake fluid changes color due to moisture contamination, fluid degradation, and the accumulation of metal particles. |
| Is dark brake fluid dangerous? | Dark brake fluid indicates contamination and reduced performance. It should be flushed and replaced. |
| How often should I check my brake fluid color? | You should check your brake fluid color monthly as part of your routine vehicle maintenance. |
| Can I mix different types of brake fluid? | DOT 3 and DOT 4 can usually be mixed, but DOT 5 should never be mixed with DOT 3, DOT 4, or DOT 5.1. Always follow your vehicle manufacturer’s recommendations. |
| What does milky brake fluid indicate? | Milky brake fluid indicates significant moisture contamination and requires an immediate flush. |
| How do I check my brake fluid color? | Locate the brake fluid reservoir, clean the outside, and inspect the fluid through the reservoir. Use a dipstick if necessary. |
| What tools do I need to check brake fluid color? | You will need gloves, eye protection, a clean cloth, and possibly a dipstick or turkey baster. |
| What are the symptoms of contaminated brake fluid? | Symptoms include dark or cloudy fluid, spongy brake pedal, and reduced braking performance. |
| Can I change brake fluid myself? | Yes, if you have experience with brake systems and the necessary tools. Otherwise, it’s best to have a professional do it. |
| How often should I flush my brake fluid? | Perform a complete brake fluid flush every 2-3 years or as recommended by your vehicle manufacturer. |
| What type of brake fluid should I use? | Always use the type of brake fluid recommended by your vehicle manufacturer. Check your owner’s manual for specifications. |
| What is the difference between DOT 3, DOT 4, and DOT 5 fluid? | DOT 3 and DOT 4 are glycol-based and hygroscopic. DOT 5 is silicone-based and non-hygroscopic. They have different boiling points and are used in different applications. |
| Does brake fluid color affect ABS systems? | Yes, certain types of brake fluid may not be compatible with ABS systems. Always use the recommended fluid type for your vehicle’s ABS system. |
| Where can I find more information about brake fluid? | You can find more information in your vehicle’s owner’s manual, online automotive forums, and from qualified mechanics. |
| Why is my brake fluid purple? | DOT 5 brake fluid is typically purple when new, but the color can fade over time. The loss of color does not necessarily indicate the fluid is bad. |
| Why is maintaining brake fluid important? | Maintaining your brake fluid properly can extend the life of your braking system and ensure safe operation by preventing brake failure and corrosion, and ensuring optimal performance. |
| What do I do if I see an unusual color in my brake fluid? | If you see an unusual color such as green or red, it indicates contamination with other fluids. You should perform an immediate brake fluid flush and identify the source of contamination. |
| How do I store brake fluid? | Store brake fluid in sealed containers to prevent moisture absorption, in a cool, dry place away from direct sunlight. |
| What are the benefits of regular brake fluid checks? | Regular brake fluid checks help prevent brake failure, extend component life, and maintain optimal braking performance. |
15. Trust WHAT.EDU.VN for Your Car Questions
Understanding what color is brake fluid is just one aspect of vehicle maintenance. Whether you are curious about hydraulic systems or need advice on choosing the right type of brake fluid, WHAT.EDU.VN is here to help.
At WHAT.EDU.VN, we understand that finding reliable answers to your questions can be challenging. That’s why we’ve created a platform where you can ask any question and receive prompt, accurate answers from knowledgeable experts. Our goal is to provide you with the information you need to make informed decisions and solve problems quickly and easily.
15.1. Why Choose WHAT.EDU.VN?
- Free Answers: Get your questions answered without any cost.
- Quick Responses: Receive timely responses from our community of experts.
- Comprehensive Information: Access a wealth of knowledge on a wide range of topics.
- User-Friendly Platform: Easily ask questions and find answers with our intuitive interface.
- Community Support: Connect with other users and share your knowledge.
15.2. How to Get Started
- Visit Our Website: Go to WHAT.EDU.VN.
- Ask Your Question: Simply type your question into the search bar.
- Get Your Answer: Receive a prompt and accurate answer from our experts.
15.3. We’re Here to Help
At WHAT.EDU.VN, we’re committed to providing you with the best possible experience. If you have any questions or need assistance, don’t hesitate to contact us. Our team is always ready to help you find the answers you need.
Contact Information:
- Address: 888 Question City Plaza, Seattle, WA 98101, United States
- WhatsApp: +1 (206) 555-7890
- Website: WHAT.EDU.VN
Don’t let your questions go unanswered. Visit WHAT.EDU.VN today and get the answers you need for free Get fast, reliable, and free answers to all your questions at WHAT.EDU.VN. Need more information on car maintenance or brake fluid types? Ask now and connect with our community of experts today Ask your question now on what.edu.vn.