What Is An Apple Id? It’s your key to unlocking all things Apple, offering seamless access to services like iCloud, the App Store, and much more. If you’re looking to streamline your Apple experience, this guide will break down everything you need to know about creating and managing your Apple Account, ensuring you leverage its full potential and discover related functionalities, using resources from WHAT.EDU.VN.
1. Understanding What An Apple ID Is
An Apple ID, now referred to as an Apple Account, is essentially your personal account for accessing Apple services. It’s the email address and password you use to sign in to every Apple service, including iCloud, the App Store, Apple Music, iMessage, FaceTime, and more. This unified login system allows for a seamless experience across all your Apple devices and services.
Think of it as your digital passport within the Apple ecosystem. It identifies you and grants you access to personalized features, content, and settings tailored to your preferences.
2. Why You Need an Apple ID
Having an Apple ID is crucial for anyone using Apple devices or services. Here’s why:
- Access to Apple Services: It’s required to download apps from the App Store, store photos and documents in iCloud, and stream music on Apple Music.
- Device Setup and Activation: Essential for setting up and activating your iPhone, iPad, Mac, or other Apple devices.
- iCloud Storage: Provides access to iCloud, where you can back up your data, sync contacts, calendars, and notes across devices.
- Purchases and Subscriptions: Manages your purchases from the App Store, iTunes Store, and subscriptions to Apple services like Apple TV+ and Apple Arcade.
- Find My: Allows you to locate a lost or stolen Apple device, lock it remotely, or erase its data.
- Family Sharing: Enables you to share purchases, subscriptions, and iCloud storage with up to five family members.
- Security: Adds an extra layer of security to your Apple devices and data with features like two-factor authentication.
3. Creating an Apple ID on iPhone, iPad, or Apple Vision Pro
Creating an Apple ID on your iPhone, iPad, or Apple Vision Pro is a straightforward process. You can do it during the initial device setup or later through the App Store.
3.1. Creating an Apple Account During Device Setup
-
Start the Setup Process: When you first turn on your iPhone, iPad, or Apple Vision Pro, you’ll be guided through a setup process.
-
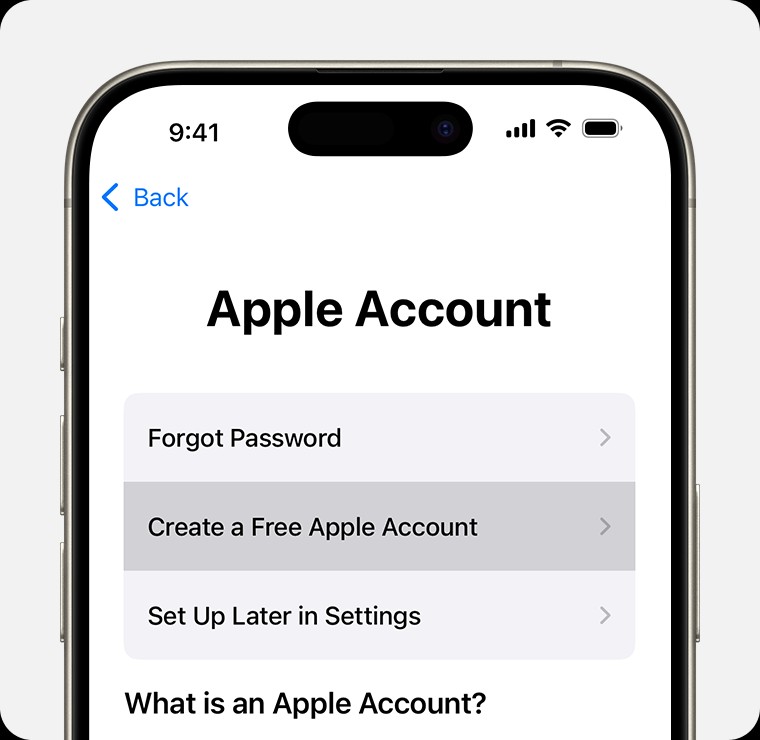
“Forgot password or don’t have an Apple Account?”: On the Apple ID screen, tap on “Forgot password or don’t have an Apple Account?”.
-
Create a Free Apple Account: Select “Create a Free Apple Account”.
-
Enter Your Information: Provide your birthday and name, then tap “Continue”.
-
Email Address: Enter a valid email address. This will be your primary Apple Account login. If you don’t have an email, tap “Don’t have an email address?” to get a free iCloud email address.
-
Verify Your Email: Follow the on-screen prompts to verify your email address.
-
Create a Strong Password: Create a secure password that you’ll remember.
-
Set Country or Region: Select your country or region.
-
Two-Factor Authentication: Set up two-factor authentication for added security. If you skip it, you’ll be prompted later in Settings.
3.2. Creating an Apple Account Through the App Store
-
Open the App Store: Locate and open the App Store app on your device.
-
My Account Button: Tap the “My Account” button, usually found at the top right.
-
Create New Apple Account: Tap “Create New Apple Account”. If you don’t see this, ensure you’re signed out of iCloud.
-
Provide Your Information: Follow the on-screen prompts to enter your email address, create a strong password, and set your country or region.
-
Payment Method and Billing: Enter your payment method and billing information, then tap “Next”. You can select “None” if you prefer. You won’t be charged unless you make a purchase.
-
Phone Number: Confirm your phone number, which helps verify your identity and recover your account if needed. Tap “Next”.
-
Email Verification: Check your email for a verification email from Apple and verify your email address.
4. Creating an Apple ID on Mac
Creating an Apple Account on your Mac is just as simple.
-
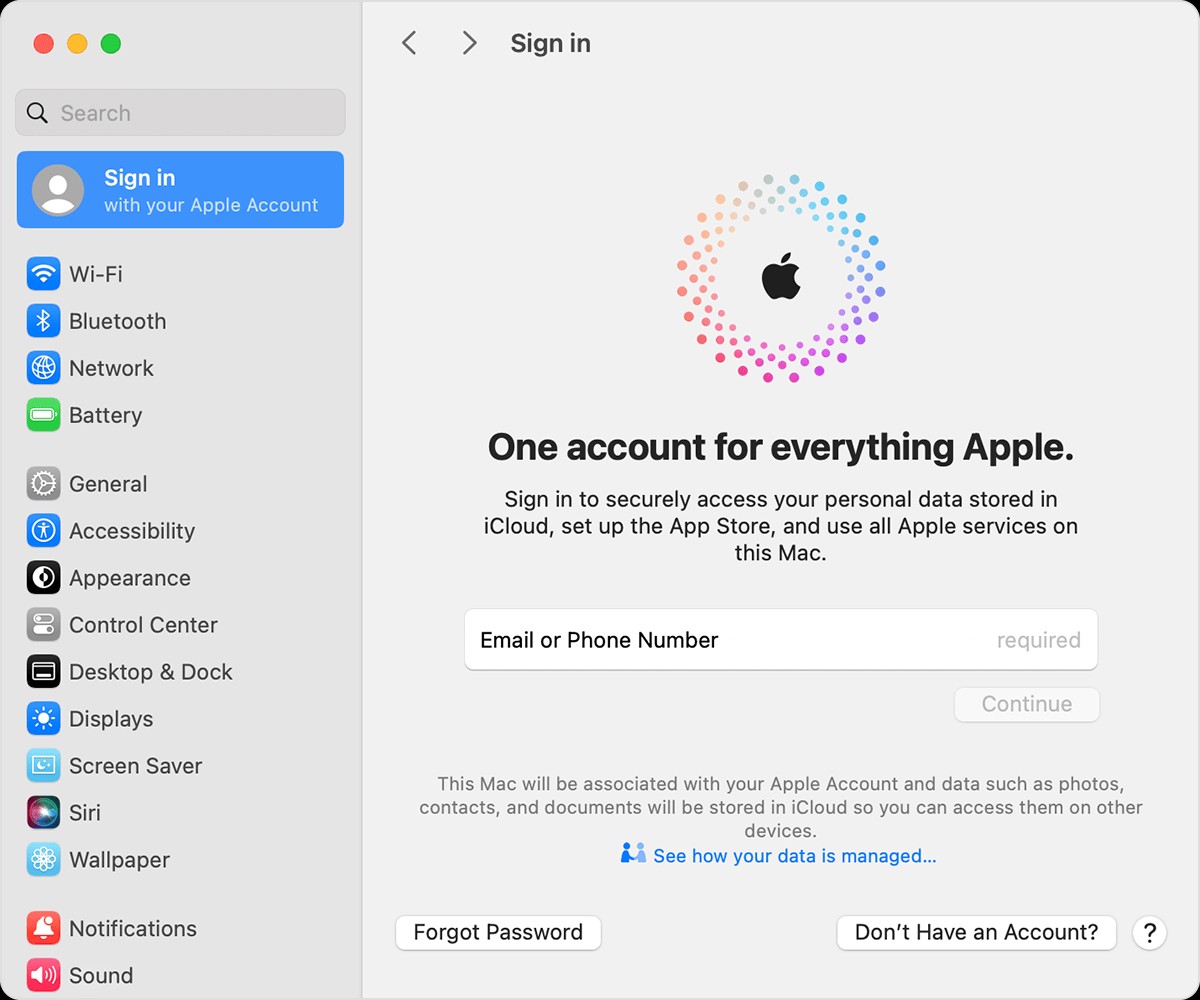
System Settings: Go to the Apple menu and select “System Settings”.
-
Sign In: In the sidebar, click “Sign in”.
-
“Don’t Have an Account?”: Click “Don’t Have an Account?”, then follow the on-screen instructions.
-
Enter Your Information: Enter your birthday, email address, create a strong password, and set your country or region.
-
Payment Method and Billing: Enter your payment method and billing information, then click “Continue”. You can also choose “None”. You won’t be charged until you make a purchase.
-
Phone Number: Confirm your phone number. Click “Next”.
-
Email Verification: Check your email for a verification email from Apple and verify your email address.
5. Creating an Apple ID on a Windows PC
You can create an Apple Account on your Windows PC using the Apple TV app, the Apple Music app, or iTunes for Windows.
5.1. Using the Apple TV App or Apple Music App
- Sign In: Click “Sign In” at the bottom of the sidebar.
- Create New Apple Account: Click “Create New Apple Account”.
- Follow Instructions: Follow the on-screen steps to provide an email address, create a strong password, and set your device region.
- Payment Information: Enter your payment method and billing information, then click “Continue”. You can also choose “None”.
- Email Verification: Check your email for a verification email from Apple and verify your email address.
5.2. Using iTunes for Windows
- Open iTunes: Open iTunes for Windows.
- Account Menu: From the menu bar, choose “Account > Sign In”. Then click “Create New Apple Account”.
- Follow Instructions: Follow the on-screen steps to provide an email address, create a strong password, and set your device region.
- Payment Information: Enter your payment method and billing information, then click “Continue”. You can also choose “None”.
- Email Verification: Check your email for a verification email from Apple and verify your email address.
6. Creating an Apple ID on Another Device
You can create an Apple Account on various devices like Apple TV, Android devices, smart TVs, or streaming devices. Generally, follow the on-screen prompts and provide the required information, such as your full name, date of birth, email address or phone number, and a payment method. On some smart TVs, you might be redirected to activate.apple.com.
7. Creating an Apple ID on the Web
Creating an Apple Account on the web is perhaps the most universal method.
-
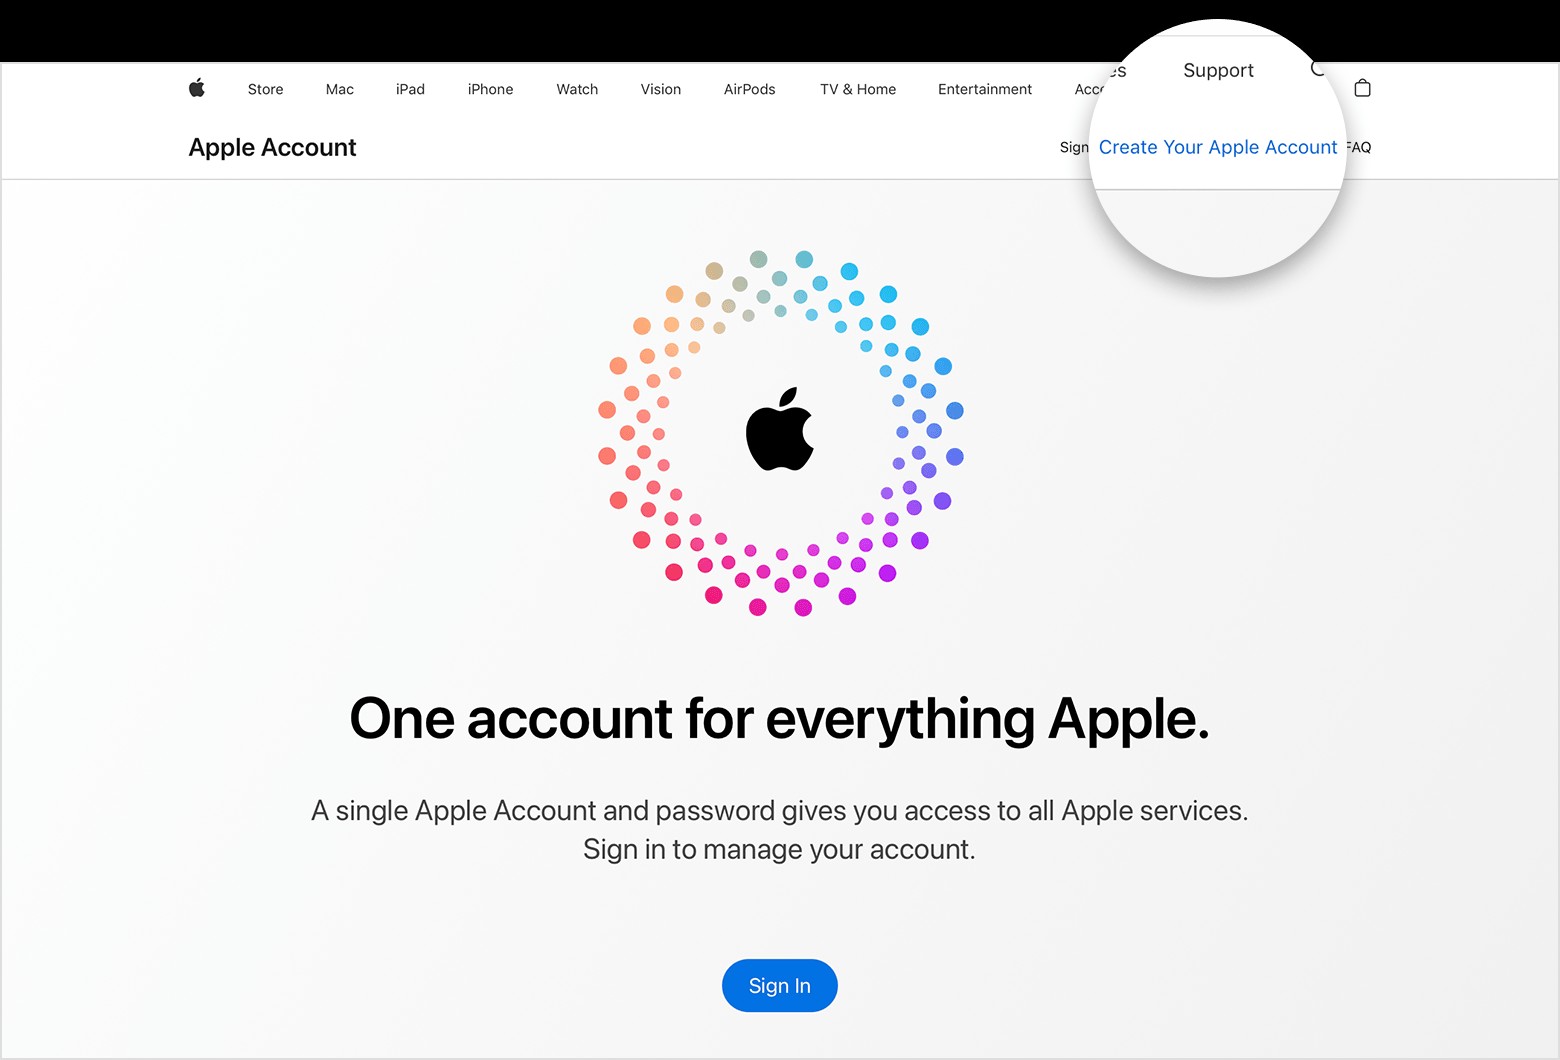
Go to Apple Account Website: Visit
account.apple.comin your web browser. -
Create Your Apple Account: Click “Create Your Apple Account”.
-
Follow Instructions: Follow the on-screen steps to provide an email address, create a strong password, and set your device region.
-
Birthday and Phone Number: Enter your birthday and a phone number that you can always access.
-
Apple Updates (Optional): Check the boxes to subscribe to Apple Updates if you’d like to stay informed about Apple’s latest news, software, products, and services.
-
Continue: Click “Continue”.
-
Verify Information: Follow the on-screen steps to verify your email address and phone number.
8. Common Issues and Solutions
Creating and managing an Apple ID can sometimes present challenges. Here are some common issues and how to resolve them.
8.1. “This Email Address Is Already in Use”
- Problem: This error appears when the email address you’re trying to use is already associated with an existing Apple ID.
- Solution:
- Check Existing Accounts: Verify if you or someone else in your family has already created an Apple ID with this email.
- Password Reset: If you have an existing account, try resetting the password.
- Use a Different Email: Use an alternate email address if you can’t access the existing account.
8.2. Verification Email Not Received
- Problem: You didn’t receive the verification email from Apple after creating your account.
- Solution:
- Check Spam/Junk Folder: The email might be filtered into your spam or junk folder.
- Resend Verification Email: Go to
account.apple.comand resend the verification email. - Verify Email Address: Ensure you entered the correct email address during signup.
- Contact Support: If you still don’t receive it, contact Apple Support.
8.3. Security Questions Forgotten
- Problem: You forgot the answers to your security questions.
- Solution:
- Password Reset: If you have a rescue email address or two-factor authentication enabled, use those methods to reset your password.
- Contact Support: If all else fails, contact Apple Support for assistance.
8.4. Account Locked for Security Reasons
- Problem: Your account is locked due to multiple incorrect login attempts.
- Solution:
- Password Reset: Reset your password via email or security questions.
- Wait It Out: In some cases, the account will unlock automatically after a period of inactivity.
- Contact Support: Contact Apple Support if you need immediate assistance.
8.5. Problems with Two-Factor Authentication
- Problem: Issues with receiving or using verification codes for two-factor authentication.
- Solution:
- Check Trusted Devices: Ensure your trusted devices are listed correctly in your Apple ID settings.
- Get Verification Code: Request a verification code from one of your trusted devices.
- SMS Delivery: Ensure your phone number is correct and can receive SMS messages.
- Recovery Key: If you set up a recovery key, use it to regain access.
8.6. Payment Method Issues
- Problem: Difficulty adding or verifying a payment method to your Apple ID.
- Solution:
- Check Card Details: Ensure the card number, expiration date, and CVV are correct.
- Billing Address: Verify that the billing address matches the one associated with your card.
- Card Restrictions: Check if your bank has any restrictions on online or international transactions.
- Try a Different Card: Use an alternate credit or debit card.
- Contact Support: Contact your bank or Apple Support for further assistance.
9. Securing Your Apple ID
Security should be a top priority when managing your Apple Account. Here are some best practices to keep your account safe.
9.1. Strong Passwords
- Create Complex Passwords: Use a combination of upper and lower-case letters, numbers, and symbols.
- Avoid Personal Information: Don’t use easily guessable information like your birthday, name, or pet’s name.
- Use a Password Manager: Consider using a password manager to generate and store strong, unique passwords.
- Regularly Update: Change your password periodically to enhance security.
9.2. Two-Factor Authentication
- Enable Two-Factor Authentication: This adds an extra layer of security by requiring a verification code from a trusted device or phone number when you sign in.
- Keep Trusted Devices Secure: Protect the devices you use for two-factor authentication with passcodes or biometric authentication.
9.3. Recovery Key
- Generate a Recovery Key: If you’re concerned about losing access to your trusted devices, generate a recovery key and store it in a safe place.
- Keep It Secure: This key can be used to regain access to your account if you lose access to your trusted devices and can’t receive verification codes.
9.4. Be Cautious of Phishing
- Recognize Phishing Attempts: Be wary of emails, messages, or phone calls asking for your Apple ID password or other sensitive information.
- Verify Emails: Always verify the sender’s email address and check for inconsistencies or errors.
- Don’t Click Suspicious Links: Avoid clicking on links from unknown sources.
- Report Phishing: Report any suspected phishing attempts to Apple.
9.5. Review Account Activity
- Regularly Check Activity: Periodically review your Apple ID account activity to look for any unauthorized access or suspicious transactions.
- Monitor Purchases: Keep an eye on your purchase history in the App Store, iTunes Store, and other Apple services.
- Report Suspicious Activity: If you notice anything unusual, change your password immediately and contact Apple Support.
9.6. Keep Your Information Updated
- Update Email and Phone Number: Ensure your email address and phone number are current in your Apple ID settings.
- Add a Rescue Email: Add a rescue email address that you can use to reset your password if you lose access to your primary email.
- Update Trusted Devices: Keep your list of trusted devices up to date and remove any devices you no longer use.
10. Managing Your Apple ID
Managing your Apple ID effectively ensures you have control over your account and can make necessary changes as needed.
10.1. Accessing Your Apple ID Settings
- On iPhone, iPad, or iPod touch: Go to Settings > [Your Name].
- On Mac: Choose Apple menu > System Settings, then click Apple ID.
- Online: Visit
account.apple.comand sign in.
10.2. Changing Your Password
- In Settings or System Settings: Go to Password & Security and tap Change Password.
- Online: Sign in to
account.apple.com, go to Security, and click Change Password.
10.3. Updating Your Payment Information
- In Settings or System Settings: Go to Payment & Shipping and update your payment details.
- Online: Sign in to
account.apple.com, go to Payment & Shipping, and edit your payment information.
10.4. Updating Your Personal Information
- In Settings or System Settings: Go to Personal Information to update your name, birthday, and other details.
- Online: Sign in to
account.apple.com, go to Personal Information, and edit your information.
10.5. Managing Subscriptions
- In Settings or System Settings: Go to Subscriptions to view and manage your active subscriptions.
- App Store: Open the App Store, tap your profile icon, and select Subscriptions.
10.6. Family Sharing
- Setting Up Family Sharing: In Settings or System Settings, go to Family Sharing and follow the instructions to set up or manage your family group.
- Sharing Purchases and Subscriptions: With Family Sharing, you can share App Store purchases, Apple Music, iCloud storage, and more with up to five family members.
11. Apple ID and iCloud
Your Apple ID is deeply integrated with iCloud, Apple’s cloud storage and synchronization service. Here’s how they work together.
11.1. iCloud Storage
- Free Storage: Apple provides 5GB of free iCloud storage with every Apple ID.
- Upgrading Storage: You can upgrade your iCloud storage plan for more space.
- iCloud Drive: Store files in iCloud Drive and access them from any device.
11.2. Syncing Data
- Contacts, Calendars, and Notes: Sync your contacts, calendars, notes, and reminders across all your devices.
- Photos and Videos: Store your photos and videos in iCloud Photos and access them from any device.
- iCloud Backup: Back up your iPhone, iPad, or iPod touch to iCloud.
11.3. Find My
- Locate Lost Devices: Use the Find My app or iCloud website to locate a lost or stolen Apple device.
- Lock or Erase Devices: Remotely lock or erase your device to protect your data.
- Activation Lock: Activation Lock prevents anyone else from using your device if it’s lost or stolen.
11.4. iCloud Keychain
- Password Management: iCloud Keychain securely stores your passwords, credit card information, and Wi-Fi passwords.
- Automatic Filling: Automatically fill in passwords and credit card information on websites and in apps.
12. Apple ID and Security
Apple places a strong emphasis on the security of Apple IDs and the data associated with them.
12.1. Data Encryption
- End-to-End Encryption: Many Apple services, including iMessage and FaceTime, use end-to-end encryption to protect your data.
- Data at Rest: Apple also encrypts data stored on its servers to prevent unauthorized access.
12.2. Privacy Controls
- Transparency and Control: Apple provides transparency and control over your data through its Privacy settings.
- App Tracking Transparency: App Tracking Transparency lets you control whether apps can track your activity across other companies’ apps and websites.
12.3. Security Updates
- Regular Updates: Apple regularly releases security updates to address vulnerabilities and protect your devices and data.
- Automatic Updates: Enable automatic software updates to ensure you always have the latest security protections.
13. Frequently Asked Questions (FAQs) about Apple IDs
To further clarify any remaining questions, here’s a list of frequently asked questions about Apple IDs.
| Question | Answer |
|---|---|
| What is an Apple ID? | An Apple ID, now referred to as an Apple Account, is your personal account for accessing Apple services like iCloud, the App Store, and Apple Music. |
| Why do I need an Apple ID? | You need an Apple ID to access Apple services, download apps, store data in iCloud, and manage your devices. |
| How do I create an Apple ID? | You can create an Apple ID on your iPhone, iPad, Mac, Windows PC, or on the web by visiting account.apple.com. |
| What if I forgot my Apple ID password? | You can reset your password by visiting iforgot.apple.com or through the Settings app on your Apple device. |
| How do I enable two-factor authentication? | Go to Settings > [Your Name] > Password & Security > Turn On Two-Factor Authentication. |
| Can I use a non-Apple email address for my Apple ID? | Yes, you can use any valid email address to create an Apple ID. |
| How do I change my Apple ID email address? | Sign in to account.apple.com, go to Account, and click Edit next to Apple ID. |
| What is Family Sharing? | Family Sharing allows you to share App Store purchases, Apple Music, iCloud storage, and more with up to five family members. |
| How do I manage my iCloud storage? | Go to Settings > [Your Name] > iCloud > Manage Storage. |
| What is Find My iPhone? | Find My iPhone helps you locate a lost or stolen Apple device, lock it remotely, or erase its data. |

14. Apple ID Alternatives and Considerations
While an Apple ID is essential for full integration with the Apple ecosystem, there are a few alternatives and considerations to keep in mind.
14.1. Using Apple Devices Without an Apple ID
- Limited Functionality: It’s possible to use some Apple devices without an Apple ID, but functionality will be severely limited.
- Web Browsing: You can still use Safari for web browsing and access some basic features.
- No App Store Access: Without an Apple ID, you won’t be able to download apps from the App Store.
- No iCloud Features: You won’t be able to use iCloud for storage, backups, or syncing data.
14.2. Guest Mode on iPad
- Temporary Access: The iPad offers a Guest Mode that allows temporary access to the device without requiring an Apple ID.
- Limited Features: Guest Mode provides limited features and doesn’t save any data.
14.3. Alternatives for Specific Services
- Email: If you don’t want to use iCloud Mail, you can use alternative email providers like Gmail or Outlook.
- Cloud Storage: Alternatives to iCloud include Google Drive, Dropbox, and Microsoft OneDrive.
- Music Streaming: If you don’t want to use Apple Music, you can use alternative music streaming services like Spotify or YouTube Music.
14.4. Considerations for Privacy
- Data Collection: Be aware that Apple collects data associated with your Apple ID, but it also provides privacy controls to manage your data.
- Review Privacy Settings: Review your privacy settings regularly to ensure they align with your preferences.
15. The Future of Apple ID: What to Expect
As technology evolves, so too will the Apple ID. Here are some potential future developments.
15.1. Enhanced Security Features
- Biometric Authentication: Expect further integration of biometric authentication methods like Face ID and Touch ID.
- Advanced Threat Detection: Apple will likely continue to enhance its threat detection capabilities to protect against phishing and other security threats.
15.2. Improved Privacy Controls
- Greater Transparency: Apple will likely provide greater transparency about how your data is used.
- More Control: Expect more granular control over your privacy settings.
15.3. Integration with Emerging Technologies
- Augmented Reality (AR) and Virtual Reality (VR): Apple IDs may play a crucial role in managing identity and access in AR and VR environments.
- Artificial Intelligence (AI): AI-powered features may help you manage your Apple ID and protect your data.
15.4. Simplified Account Management
- User-Friendly Interface: Apple may simplify the Apple ID management interface to make it easier to use.
- Automated Tasks: Expect more automated tasks for managing your account, such as password resets and security checks.
16. Conclusion: Mastering Your Apple ID Experience
Mastering your Apple ID is essential for unlocking the full potential of the Apple ecosystem. From creating an account to managing security and privacy, understanding every aspect of your Apple ID ensures a seamless and secure experience across all your devices and services. By following the tips and guidelines outlined in this comprehensive guide, you can confidently navigate the world of Apple and make the most of your digital life.
Have more questions or need further assistance? Don’t hesitate to reach out to the experts at WHAT.EDU.VN. We’re here to provide free answers and guidance to all your tech-related queries. Contact us at 888 Question City Plaza, Seattle, WA 98101, United States. You can also reach us on Whatsapp at +1 (206) 555-7890 or visit our website at what.edu.vn. Let us help you unlock the full potential of your Apple devices and beyond.
Remember, keeping your Apple ID secure and well-managed is crucial in today’s digital landscape. Take the time to implement the best practices discussed, and you’ll enjoy a safer and more rewarding experience with all things Apple.