Arduino: What Is It, What Can It Do?
Are you curious about electronics and programming? At WHAT.EDU.VN, we believe everyone should have access to free and reliable information. Arduino is an open-source platform that makes it easy to bring your creative ideas to life, offering a straightforward path into the world of physical computing. It’s a powerful tool for both beginners and experts. Think of it as a bridge between the digital world and the physical one, enabling you to build interactive projects and explore the exciting intersection of hardware and software. Discover the possibilities with Arduino and WHAT.EDU.VN: your free resource for learning.
1. Unveiling Arduino: What is Arduino?
Arduino is an open-source electronics platform centered around user-friendly hardware and software. Arduino boards excel at reading inputs—be it light hitting a sensor, a finger pressing a button, or a message arriving on Twitter—and transforming them into outputs, such as activating a motor, lighting up an LED, or posting content online. By feeding a series of commands to the microcontroller on the board, you instruct it on how to act. These commands are written in the Arduino programming language (based on Wiring) and uploaded using the Arduino Software (IDE), which itself is based on Processing. Arduino is a versatile tool for creating interactive electronic projects.
1.1. Demystifying the Core Components
To truly grasp “What Is Arduino,” let’s break down its core components:
-
The Arduino Board: This is the physical hardware, the heart of your project. It houses a microcontroller, which is essentially a small computer that can be programmed to control electronic components. Different Arduino boards exist, each with varying capabilities and features, catering to diverse project needs.
-
The Arduino IDE (Integrated Development Environment): This is the software you use to write, compile, and upload code to your Arduino board. It provides a simple and intuitive interface for programming the microcontroller.
-
The Arduino Programming Language: This is the language you use to instruct the Arduino board. It’s based on C/C++, but simplified to be more accessible to beginners.
Alt text: Close up of an Arduino Uno Rev3 board showing the microcontroller and various input/output pins.
1.2. The Arduino Ecosystem: Open-Source Advantage
Arduino’s open-source nature is one of its greatest strengths. This means:
- Free to Use: You can freely download and use the Arduino software and hardware designs.
- Community Driven: A global community of users contributes to the platform, creating libraries, tutorials, and example projects.
- Customizable: You can modify the hardware and software to suit your specific needs.
This collaborative environment fosters innovation and makes Arduino an ideal platform for learning and experimentation.
1.3. A Brief History of Arduino
Arduino emerged from the Ivrea Interaction Design Institute in Italy as a straightforward tool for rapid prototyping. Its initial target audience was students lacking extensive backgrounds in electronics and programming. However, Arduino quickly gained traction beyond the academic sphere, evolving to meet the demands of a wider community. Today, Arduino offers a diverse range of boards, from basic 8-bit models to more advanced solutions for IoT, wearables, 3D printing, and embedded systems.
2. Why Choose Arduino? Advantages Explained
Arduino’s popularity stems from its simplicity, flexibility, and affordability. Let’s delve into the specific advantages that make Arduino an excellent choice for various users:
2.1. Simplicity and Accessibility
Arduino’s user-friendly design makes it approachable for beginners, while its flexibility caters to advanced users. The Arduino Software (IDE) runs seamlessly on Mac, Windows, and Linux. Educators and students leverage Arduino to construct affordable scientific instruments, demonstrate principles in chemistry and physics, or embark on journeys into programming and robotics. Designers and architects create interactive prototypes, while musicians and artists employ it for installations and experimentation with novel musical instruments. Moreover, makers utilize Arduino to bring their creations to life at events like the Maker Faire. Arduino stands as a pivotal tool for acquiring new knowledge. Anyone, be they children, hobbyists, artists, or programmers, can commence tinkering by following step-by-step instructions from a kit or exchanging ideas online with fellow members of the Arduino community.
2.2. Cost-Effectiveness
Compared to other microcontroller platforms, Arduino boards are relatively inexpensive. You can even assemble the most basic Arduino module by hand, and pre-assembled boards are typically priced under $50. This affordability makes Arduino accessible to a wide range of users, regardless of their budget.
2.3. Cross-Platform Compatibility
The Arduino Software (IDE) is compatible with Windows, macOS, and Linux operating systems. This cross-platform compatibility ensures that you can use Arduino regardless of your preferred operating system.
2.4. Open-Source Nature: A Collaborative Ecosystem
The open-source nature of Arduino extends to both its software and hardware.
-
Open-Source Software: The Arduino software is published under an open-source license, allowing experienced programmers to extend its functionality. You can expand the language using C++ libraries or delve into the underlying AVR C programming language. You can even integrate AVR-C code directly into your Arduino programs.
-
Open-Source Hardware: The schematics for Arduino boards are released under a Creative Commons license, empowering experienced circuit designers to create their own versions, enhance them, and customize them. Even those with limited experience can build a breadboard version of the module to understand its inner workings and save money.
2.5. Versatile Applications: From Simple to Complex
Arduino’s adaptability is showcased in its myriad applications. From basic tasks like blinking an LED to sophisticated projects such as building a self-driving car, Arduino offers a flexible platform for innovation and exploration.
3. What Can You Do With Arduino? Unleashing Creativity
Arduino’s versatility allows you to create a wide range of projects, limited only by your imagination. Here are some examples to spark your creativity:
3.1. Home Automation
- Smart Lighting: Control your lights remotely or automatically adjust them based on ambient light levels.
- Automated Garden: Monitor soil moisture and automatically water your plants.
- Security System: Build a DIY security system with motion sensors and alerts.
3.2. Robotics
- Simple Robots: Create robots that can follow lines, avoid obstacles, or be controlled remotely.
- Robot Arms: Build a robotic arm that can perform tasks such as picking and placing objects.
Alt text: A two-wheeled Arduino robot car with sensors and electronic components visible.
3.3. Art and Music
- Interactive Installations: Create art installations that respond to user interaction or environmental factors.
- Musical Instruments: Build custom musical instruments with unique sounds and interfaces.
3.4. Environmental Monitoring
- Weather Station: Collect and display weather data such as temperature, humidity, and pressure.
- Air Quality Monitor: Measure air pollutants and track air quality in your area.
3.5. Wearable Technology
- Smartwatch: Build a custom smartwatch with features such as time display, notifications, and fitness tracking.
- Interactive Clothing: Integrate sensors and LEDs into clothing to create interactive garments.
These are just a few examples of the endless possibilities with Arduino. As you gain experience, you can explore more complex projects and push the boundaries of what’s possible.
4. Getting Started with Arduino: A Practical Guide
Ready to embark on your Arduino journey? Here’s a step-by-step guide to get you started:
4.1. Essential Equipment:
- An Arduino Board: Choose a board that suits your project requirements. The Arduino Uno is a popular choice for beginners.
- A USB Cable: Used to connect the Arduino board to your computer for programming.
- A Computer: With the Arduino IDE installed.
- Electronic Components: Such as LEDs, resistors, buttons, sensors, and wires, depending on your project.
4.2. Setting Up the Arduino IDE:
- Download the Arduino IDE: Visit the official Arduino website and download the appropriate version for your operating system.
- Install the Arduino IDE: Follow the on-screen instructions to install the software.
- Connect Your Arduino Board: Connect the Arduino board to your computer using the USB cable.
- Select Your Board and Port: In the Arduino IDE, go to “Tools” > “Board” and select your Arduino board model. Then, go to “Tools” > “Port” and select the port that your Arduino board is connected to.
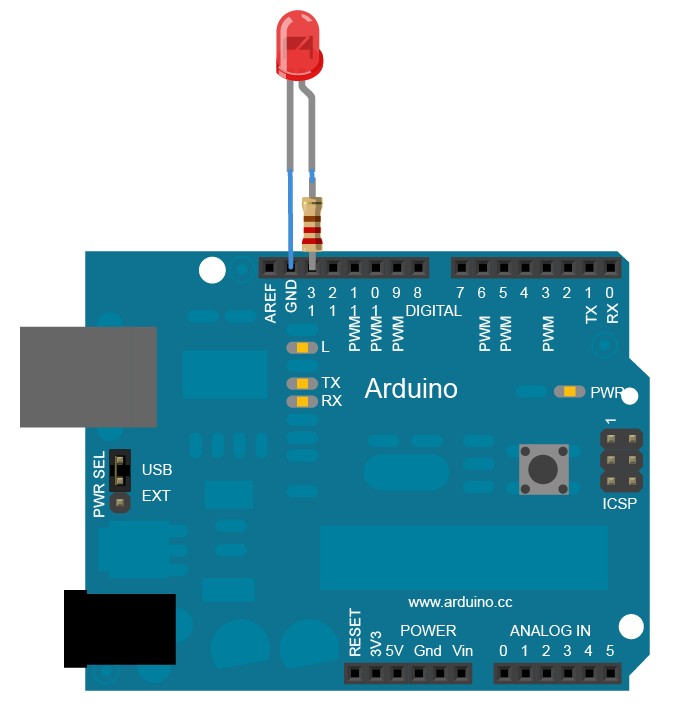
4.3. Your First Project: Blinking an LED
This classic “Hello World” project for Arduino will help you understand the basics of programming and controlling an LED.
- Connect the LED: Connect the longer leg (anode) of the LED to a digital pin on the Arduino board (e.g., pin 13) through a resistor (e.g., 220 ohms). Connect the shorter leg (cathode) of the LED to the ground (GND) pin on the Arduino board.
- Write the Code: Open the Arduino IDE and paste the following code:
void setup() {
  // initialize digital pin 13 as an output.
  pinMode(13, OUTPUT);
}

void loop() {
  digitalWrite(13, HIGH);   // turn the LED on (HIGH is the voltage level)
  delay(1000);               // wait for a second
  digitalWrite(13, LOW);    // turn the LED off by making the voltage LOW
  delay(1000);               // wait for a second
}-
Upload the Code: Click the “Upload” button in the Arduino IDE. The code will be compiled and uploaded to your Arduino board.
-
Observe the Result: The LED connected to pin 13 should start blinking on and off every second.
Congratulations! You’ve successfully completed your first Arduino project.
4.4. Expanding Your Knowledge
- Explore Arduino Tutorials: Numerous online tutorials and resources are available to guide you through various Arduino projects.
- Join the Arduino Community: Connect with other Arduino enthusiasts online to ask questions, share ideas, and collaborate on projects.
- Experiment and Learn: Don’t be afraid to try new things and experiment with different components and code. The best way to learn is by doing.
5. Arduino Project Ideas: Inspiration for Your Next Creation
Need some inspiration for your next Arduino project? Here are a few ideas to get you started:
5.1. Interactive Art Installation
Create an art installation that responds to user interaction or environmental factors. For example, you could build a sculpture that changes color based on the proximity of people or the level of ambient noise.
Alt text: A modern interactive art installation with colorful lights and geometric shapes.
5.2. Automated Plant Watering System
Build a system that automatically waters your plants based on soil moisture levels. This project is perfect for those who travel frequently or tend to forget to water their plants.
5.3. Home Security System
Create a DIY home security system with motion sensors and alerts. This project can help you protect your home and deter burglars.
5.4. Weather Station
Collect and display weather data such as temperature, humidity, and pressure. This project is great for those interested in meteorology or simply curious about the weather in their area.
5.5. Remote Controlled Car
Build a remote-controlled car that can be controlled using a smartphone or other device. This project is a fun way to learn about robotics and wireless communication.
5.6. Custom Game Controller
Design and build your own custom game controller with unique buttons, joysticks, and sensors. This project is perfect for gamers who want a personalized gaming experience.
5.7. Smart Mirror
Create a smart mirror that displays information such as the time, weather, and news. This project is a great way to add a touch of technology to your bathroom or bedroom.
5.8. Voice Controlled Home Automation
Build a system that allows you to control your home appliances using voice commands. This project is a great way to automate your home and make your life easier.
These are just a few examples of the many Arduino projects you can create. With a little creativity and some basic electronics knowledge, you can build anything you can imagine.
6. Common Challenges and Solutions in Arduino Projects
While Arduino is user-friendly, you may encounter some challenges along the way. Here are some common issues and their solutions:
6.1. Code Errors
- Problem: The Arduino IDE displays error messages when compiling or uploading code.
- Solution: Carefully review the error messages and compare your code to example code or tutorials. Check for typos, missing semicolons, and incorrect syntax.
6.2. Hardware Issues
- Problem: Components are not working as expected.
- Solution: Double-check all connections and ensure that components are properly connected to the Arduino board. Use a multimeter to test components and wires for continuity.
6.3. Power Supply Problems
- Problem: The Arduino board or connected components are not receiving enough power.
- Solution: Ensure that the power supply is providing the correct voltage and current. Use a separate power supply for components that require more power than the Arduino board can provide.
6.4. Sensor Calibration
- Problem: Sensors are providing inaccurate readings.
- Solution: Calibrate the sensors using known reference values. Consult the sensor’s datasheet for calibration instructions.
6.5. Communication Problems
- Problem: The Arduino board is not communicating with other devices or computers.
- Solution: Check the communication protocols and settings. Ensure that the baud rates and data formats are compatible.
6.6. Memory Limitations
- Problem: The Arduino board runs out of memory when running complex programs.
- Solution: Optimize your code to reduce memory usage. Use smaller data types and avoid unnecessary variable declarations. Consider using an Arduino board with more memory.
6.7. Interference and Noise
- Problem: Electronic noise interferes with sensor readings or communication signals.
- Solution: Use shielded cables and filters to reduce noise. Keep wires short and organized to minimize interference.
6.8. Debugging Techniques
- Serial Monitoring: Use the serial monitor in the Arduino IDE to print debugging messages and monitor variable values.
- LED Indicators: Use LEDs to indicate the status of different parts of your code or hardware.
- Code Comments: Add comments to your code to explain what each section does. This will help you understand your code and debug it more easily.
 Arduino Circuit Debugging
7. Advanced Arduino Concepts: Taking Your Skills Further
Once you’ve mastered the basics of Arduino, you can explore more advanced concepts to enhance your projects:
7.1. Interrupts
Interrupts allow your Arduino to respond to external events in real-time. Instead of constantly checking for a specific condition, the Arduino can be interrupted when the event occurs, allowing it to react immediately.
7.2. Timers
Timers allow you to schedule events to occur at specific intervals. This is useful for creating time-based animations, controlling motors, and measuring time.
7.3. EEPROM
EEPROM (Electrically Erasable Programmable Read-Only Memory) allows you to store data on the Arduino board even when it’s powered off. This is useful for storing configuration settings, sensor calibration data, and other persistent information.
7.4. Communication Protocols
Arduino supports various communication protocols, including:
- Serial Communication (UART): Used for communicating with computers, other microcontrollers, and serial devices.
- I2C (Inter-Integrated Circuit): Used for communicating with sensors, memory chips, and other devices on a short-range, two-wire bus.
- SPI (Serial Peripheral Interface): Used for communicating with sensors, memory chips, and other devices on a high-speed, three-wire or four-wire bus.
7.5. Real-Time Operating Systems (RTOS)
An RTOS allows you to run multiple tasks concurrently on the Arduino board. This is useful for complex projects that require precise timing and control.
7.6. Wireless Communication
Arduino can be used with various wireless communication modules, including:
- Bluetooth: Used for short-range wireless communication with smartphones, computers, and other Bluetooth devices.
- Wi-Fi: Used for connecting to the internet and communicating with other devices on a local network.
- LoRa (Long Range): Used for long-range wireless communication with low power consumption.
7.7. Internet of Things (IoT)
Arduino is a popular platform for building IoT devices. You can connect your Arduino projects to the internet to collect data, control devices remotely, and integrate with other IoT services.
8. Arduino vs. Other Microcontroller Platforms
While Arduino is a popular choice, other microcontroller platforms are available. Here’s a comparison to help you decide which platform is right for you:
8.1. Arduino vs. Raspberry Pi
- Arduino: A microcontroller platform designed for real-time control of electronic components.
- Raspberry Pi: A single-board computer that runs a full operating system.
Arduino is better suited for projects that require precise timing and control, while Raspberry Pi is better suited for projects that require more processing power and a full operating system.
8.2. Arduino vs. ESP32
- Arduino: A microcontroller platform with a wide range of boards and shields.
- ESP32: A microcontroller with built-in Wi-Fi and Bluetooth connectivity.
ESP32 is a good choice for projects that require wireless communication, while Arduino offers a wider range of options for other applications.
8.3. Arduino vs. Micro:bit
- Arduino: A microcontroller platform with a wide range of options for customization and expansion.
- Micro:bit: A small, self-contained microcontroller designed for educational purposes.
Micro:bit is a good choice for beginners who want a simple and easy-to-use platform, while Arduino offers more flexibility and customization options for advanced users.
8.4. Comparison Table
| Feature | Arduino | Raspberry Pi | ESP32 | Micro:bit |
|---|---|---|---|---|
| Microcontroller | Yes | No | Yes | Yes |
| Operating System | No | Yes | No | No |
| Wi-Fi | Optional | Optional | Built-in | Optional |
| Bluetooth | Optional | Optional | Built-in | Built-in |
| Cost | Lower | Higher | Lower | Lower |
| Complexity | Moderate | Higher | Moderate | Lower |
| Use Cases | Real-time control, electronics projects | General-purpose computing, media servers | IoT devices, wireless communication | Educational projects, beginner-friendly |
9. The Future of Arduino: Trends and Innovations
Arduino continues to evolve and adapt to new technologies. Here are some trends and innovations shaping the future of Arduino:
9.1. Artificial Intelligence (AI) and Machine Learning (ML)
Arduino is increasingly being used in AI and ML projects. Libraries and tools are available to run machine learning models on Arduino boards, enabling applications such as object recognition, voice control, and predictive maintenance.
9.2. Internet of Things (IoT) Expansion
Arduino is playing a key role in the growth of the IoT. New Arduino boards and modules are being developed to support various IoT communication protocols, making it easier to connect devices to the internet and build smart home, industrial, and agricultural applications.
9.3. Edge Computing
Edge computing involves processing data closer to the source, rather than sending it to the cloud. Arduino is well-suited for edge computing applications, allowing you to perform real-time analysis and control of devices without relying on a constant internet connection.
9.4. Open-Source Hardware Evolution
The open-source hardware movement is driving innovation in Arduino. New Arduino boards and modules are being developed by independent developers and companies, expanding the platform’s capabilities and catering to niche applications.
9.5. Sustainability and Environmental Monitoring
Arduino is being used in a growing number of projects focused on sustainability and environmental monitoring. Applications include air quality monitoring, water quality monitoring, and smart agriculture.
9.6. Education and Accessibility
Arduino continues to be a popular platform for education, providing students with a hands-on way to learn about electronics, programming, and engineering. New educational resources and kits are being developed to make Arduino even more accessible to learners of all ages.
10. Frequently Asked Questions (FAQ) About Arduino
Here are some frequently asked questions about Arduino:
| Question | Answer |
|---|---|
| What is the difference between Arduino and a microcontroller? | Arduino is a platform built around a microcontroller. The microcontroller is the brain, while Arduino provides the hardware and software ecosystem for programming and using it. |
| What programming language does Arduino use? | Arduino uses a simplified version of C/C++. |
| What is the best Arduino board for beginners? | The Arduino Uno is a popular choice for beginners due to its simplicity and extensive documentation. |
| Do I need to know electronics to use Arduino? | Basic electronics knowledge is helpful but not essential. You can start with simple projects and learn as you go. |
| Where can I find Arduino tutorials and resources? | The official Arduino website, online forums, and YouTube are excellent resources for learning Arduino. |
| How much does an Arduino board cost? | Arduino boards range in price from a few dollars to over $100, depending on the features and capabilities. |
| Can I use Arduino for commercial projects? | Yes, you can use Arduino for commercial projects. However, you need to comply with the Arduino licensing terms. |
| What is the difference between Arduino and Genuino? | Arduino and Genuino were the same platform, but Genuino was used for boards sold outside of the United States due to trademark issues. This distinction is no longer relevant as all boards are now sold under the Arduino name. |
| How do I power an Arduino board? | You can power an Arduino board using a USB cable, an external power supply, or a battery. |
| What is an Arduino shield? | An Arduino shield is a pre-built circuit board that plugs into an Arduino board to add specific functionality, such as motor control, wireless communication, or sensor interfacing. |
| Can I use Arduino to control a motor? | Yes, you can use Arduino to control a motor. You will need a motor driver circuit to provide the necessary current and voltage to the motor. |
| How do I connect sensors to an Arduino board? | You can connect sensors to an Arduino board using wires and resistors. You will need to consult the sensor’s datasheet to determine the correct wiring and connections. |
| What is the Arduino IDE? | The Arduino IDE (Integrated Development Environment) is the software you use to write, compile, and upload code to your Arduino board. |
| Where can I buy Arduino boards and components? | You can buy Arduino boards and components from online retailers such as Amazon, Adafruit, and SparkFun, as well as from local electronics stores. |
| How do I upload code to an Arduino board? | You upload code to an Arduino board using the Arduino IDE. Connect the Arduino board to your computer using a USB cable, select the correct board and port in the IDE, and click the “Upload” button. |
What is the purpose of the void setup() function in Arduino code? |
The void setup() function is called once when the Arduino board starts. It is used to initialize variables, set pin modes, and perform other setup tasks. |
What is the purpose of the void loop() function in Arduino code? |
The void loop() function is called repeatedly after the void setup() function. It is used to execute the main program logic. |
| How do I use libraries in Arduino code? | You can use libraries in Arduino code by including the library’s header file at the beginning of your code using the #include directive. You can then use the functions and classes defined in the library. |
| What is the difference between digital and analog pins on an Arduino board? | Digital pins can be used to read or write digital signals (HIGH or LOW), while analog pins can be used to read analog signals (values between 0 and 1023). |
| How do I use the serial monitor in the Arduino IDE? | The serial monitor is a window in the Arduino IDE that allows you to send and receive serial data from the Arduino board. It is useful for debugging and displaying information. |
This FAQ provides a starting point for understanding Arduino. As you explore the platform, you’ll discover even more possibilities and applications.
11. Call to Action: Your Journey Starts Now!
Ready to dive into the exciting world of Arduino? Don’t let your questions hold you back. Visit WHAT.EDU.VN today and ask your questions for free! Our community of experts is eager to help you unlock your creative potential. Whether you’re a student, hobbyist, or professional, we have the answers you need to succeed. Contact us at 888 Question City Plaza, Seattle, WA 98101, United States or Whatsapp: +1 (206) 555-7890. Let WHAT.EDU.VN be your guide on your Arduino journey! Visit our website: what.edu.vn